D'1 Motif- Coral :Pattern- Schemi motivo D'1- Corallo

Ecco le istruzioni per fare il motivo D'1 ,ora battezzato Corallo.

Coral D'1 motif pattern 

Start with the SR:
in the starting SR leave a very small picot between the first half and the second half.

SR:  5-2--2--5/4-4 close ring
CH: 5-5
Reverse work
Ring: 10+ (join to the split ring's second half picot) 6-5--2--2---2--2--5 close ring
*SR 5-2--2-5/4-4 close ring
CH: 5-5
Reverse work
Ring: 10+(join to the split ring's second half picot) 6+(join to the picot on the chain)5--2--2---2--2--5 close ring*

repeat from * to * the number of times you desire.

hope you like it, do it and improve it


here's my result: Coral Edging


Enjoy!

D'

Coral Motif

Here my new motif, I'm trying to convert this straight motif in a circular one

Patterns as soon as I can draw them.


Ecco il mio nuovo motivo. sto cercando di trasformarlo da diritto a circolare.

Schemi al più presto.


New eptagonal design

Ho finito una rielaborazione di un mio vecchio schema, migliorandone la resa estetica. è una rosetta molto semplice, dove ho voluto usare i picot "decorativi" e non solo funzionali, ecco il risultato:

I finished a remake of an old pattern of mine, improving the aesthetic look. It's a very simple rosette, where I wanted to use the "decorative" picot and not just for functional purposes, here is the result:


Enjoy!


D'ario

I Finish the SR bookmark

I've just finished this simply bookmark, that uses split rings.
I like the pattern, but it's not exactly what it meant to be in my mind.


Hope you like it!

Ho finito il segnalibro con gli split ring, è carina la tecnica, ma il risultato poteva essere migliore. vabbè, sbagliando s'impara.


Pattern on demand,if you want to reproduce it comment this post an I'll post as soon as possible a pattern to do it.

Split Ring Bookmark- Segnalibro split ring, making of

Ho cominciato a lavorare un segnalibro dal motivo modulo 1, ecco la prima parte: sei moduli lavorati invertendo i colori al termine di ciascun motivo.

I've started working a bookmark by using the module-1 unit, here the first half of the work: six modules worked switching the colors at each module end:

Ecco un particolare del solo modulo:

Here a detail of a single module:

Aggiornamenti alla fine del lavoro!

Enjoy!

D'

Modulo 1 --- Module n°1

Ecco il primo modello per i segnalibri modulari:
there is the first module for modular tatted bookmarks:

In rosso il lavoro della navetta 1
In blu il lavoro della navetta 2

in red shuttle 1 
in blue shuttle 2

Split ring, Sh2  5-3
                 Sh1  5-3 
Sh2, Ring  3+5-5-3
Rw
Sh1, Ring 3+5-5-3
Rw

Split ring Sh2 5+3
                Sh1 5+3 

Now you can start another motif, since you have the threads ready in the correct working position. 

I'll add  a photo in a plain, bright color to be more clear in the explanation. 

Enjoy!

D' 

ADD-ON: a picture of the  finished module in two colors:


Segnalibro Modulare ---Modular Bookmark

Ho trovato interessante provare gli split rings nella progettazione di una specie di "modularità" nella stesura di un lavoro piano a chiacchierino.
Potrebbero essere progettabili dei moduli interscambiabili tra di loro, per consentire una maggiore versatilità dei motivi lavorati, e pure una maggiore possibilità di "improvvisazione"del lavoro, per ottenere dei segnalibri.
Per ora ho buttato giù tre moduli che possono essere interscambiati a piacere, visto che ciascuno termina con una posizione dei fili utile per l'inizio del successivo.


I found it interesting to try the split rings in the design of a kind of "modularity" in drafting a work.
It could be possible to design modules that are interchangeable between them to allow greater flexibility of worked motifs, and also a greater chance of "improvisation" of work to have an easy personalized bookmark model.
Now, I only tried two modules that can be interchanged at will, since each one ends in a position of the threads that's useable for the beginning of the next one.


Ecco un'immagine del primo esperimento:


Here a pictures of the first experiment:


Ed ecco il particolare dei due moduli:

And here a detail of the modules:

 
Sto ragionando per esplorare la possibilità di unire il falso anello a questa tecnica.

I'm wondering 'bout using Self-Closing Mock rings to improve this concept.

A breve le istruzioni dei motivi.
Soon I'll post some instructions on doing modular bookmarks.


Cheers!


D'

Esperimento con esagoni e split ring

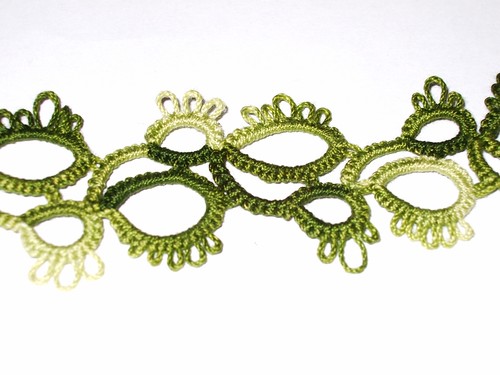
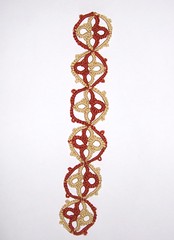
Ecco il primo esperimento di una serie che mi sta appassionando: trovare un modo per lavorare questi esagoni  senza mai tagliare il filo e perdere così molto tempo e precisione.
Non che questo nella foto sia l'avatar della precisione, ma garantisco che la trovata degli split ring mi ha risparmiato parecchio tempo.
Il concetto della procedura è piuttosto semplice: lavorare due dei sei anellini che compongono ciacun esagono con degli split ring in modo da trovarsi con i fili delle navette posizionati nel punto di inizio dell'esagono successivo.

Normalmente un lavoro del genere implicherebbe il taglio dei fili al termine di ciascun esagono e poi la lavorazione degli esagoni separati. In questo modo, invece, ho potuto lavorare tutti gli esagoni uno dopo l'altro, senza mai tagliare i fili, con un notevole risparmio di tempo.

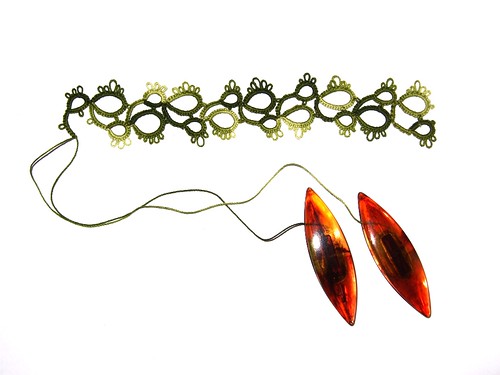
Appena avrò un po' di tempo libero conto di scrivere una guida sull'organizzazione degli split ring per ottenere il cerchio di esagoni, una catena di esagoni e uno zig-zag di esagoni.

Enjoy!

D'


This is the first experiment of a series that is taking me: find a way to work these tiny hexagons without cutting the line and losing so much time and precision.

Ok, the one in this photo isn't the avatar of precision, but I guarantee that this split ring tick saved me lot of time.
The concept of the procedure is quite simple: work two of the six rings that compose the hexagon with the split ring, so I can find the lines of the shuttles in the next starting point of the next hexagon.

Normally such work involves cutting the wires at the end of each hexagon and then processing them in a separated way. In this way, instead, I could work all the hexagons one after another, never cut the wires, with a considerable saving of time.


As soon as I have some free time to write a post of using the split ring to manage the organization of this kind of works: a circle of hexagons (the one in the picture), a chain of hexagons and a zig-zag pattern of hexagons.


Enjoy!

D '

Cominciando

Questo luogo ha come interesse primario la diffusione di prodotti manuali e tecniche ad essi correlati, rifuggendo le etichette ed esplorando le potenzialità che mani buone, collegate ad un cervello funzionante, possono avere.
Buona permanenza

D'